|
Recently I have received many
questions on how to create web pages or how to get started.
This tutorial is intended for
photographers without any prior knowledge of HTML (Hyper Text Markup
Language) or web page development
and looking into learning how to create their own web pages to
display their "work of arts".
I will not be rewriting what has
already been written hundreds of times and what is already available
in the internet in greater detail. Again, this is only to get
you started and I will lead you to resources that will take you further
into more intermediate and advance HTML techniques. Good
luck!
STEP 1: Basics - Understanding the Web
First let's understand what
happens when you start typing "http://..."
Have you ever
wondered where these web pages come from? What exactly takes
place when you type in the URL (Uniform Resource Locator) or address
of a site into your browser? There is an exchange of data
communication, transparent to the user, that takes place.
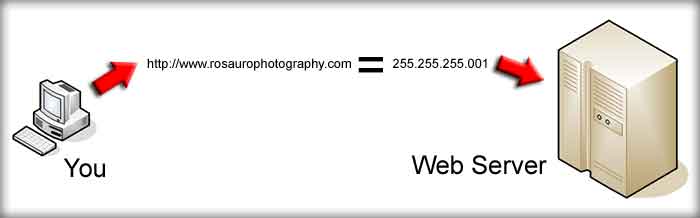
Here is a basic illustration...
How the Internet works...
You start off by typing in an
address in the URL (address) field of your browser.
When you hit the ENTER key the
"request" is then sent to the web server. The address you've
just typed is translated or resolved to an IP address of the
location of the web server.
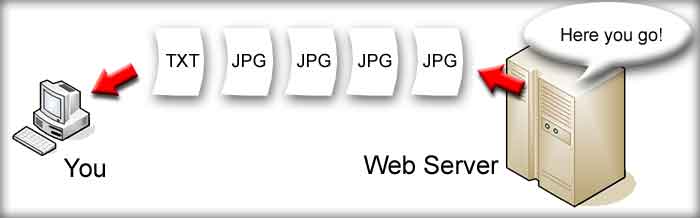
The web server then responds back
and sends you the page you've just requested for. When
you click on a link, for example "Gallery" in the initial page, the
same process takes place all over again.
That is a very basic description
of what takes place. Of course there are more technical and
complex processes that happens in both hardware and software such as
CRC (Cyclic Redundancy Check); various web applications such as IIS
(Internet Information Services - for Windows) or Apache (Unix /
Windows ....ooooh...I could hear the techies now); various
protocols; different types of firewalls and/or security; numerous
routers to get through; various types of connections, etc. The
list goes on and on. They are separate topics on their own.
For this tutorial we don't need
to know the in-depth processes that goes on but at least have a
general understanding that a lot happens when you surf on the
web. Knowing the "behind the scenes" processes will assist you in
designing a web site that is user friendly,
specifically targeted for an intended audience and enhance the
overall performance of your web site. I will get
into the details throughout the tutorial.
Basic outline of a web page.
Let's start off with the basic
structure of a web page.
|
<HTML>
<HEAD>
<TITLE> My Page </TITLE>
</HEAD>
<BODY>
My first web page
</BODY>
</HTML>
|
 See
a sample page of the code above. See
a sample page of the code above.
Simple isn't it? Copy the
above code into a text editor, like notepad in Windows, and save as
"index.html". Open the index.html file with your browser and
you'll see you've just created your very first page! Congratulation!
Now let's break it down and
understand what is going on with each section of the code.
Notice that every TAG are paired.
The accompanying tag has a "forward slash" to indicate the end of the
TAG.
|
<HTML></HTML>
<HEAD> </HEAD>
<TITLE> </TITLE>
<BODY> </BODY>
|
Any content that are encapsulated
between the TAGS are affected by the function of the TAG.
A better example of this
encapsulation...
<B>Rosauro
Photography</B>
This
<B>
means BOLD. Any text that is in between this TAG will be
bolded.
Other simple tags...
<CENTER> </CENTER>
<FONT> </FONT>
NOTE:
Not all tags need a pair.
For example...
<HR>
- Horizontal Reference
(Horizontal line)
<BR>
- Break or new line. To explicitly start a new line.
By this point you probably have
an idea whether or not this is for you. What I've shown you is
just a general intro to HTML. I encourage you to go on further
with learning HTML. At least learn a few more codes.
You'll find it very enjoyable and somewhat interesting. You
never know where it may lead you to.
I highly recommend
HTMLGOODIES by Joe Burns Ph.D
Start off with the PRIMERS. This was actually used by college
students to learn from. So, why were we paying the professors
for? So here you have it... free education.
TAGs you should learn (including
the ones previously mentioned):
|
<META>
<P>
<TABLE>, <TD>, <TR>
<FRAME>, <FRAMESET>
<A>, <A HREF>
<IMG>
<OL>, <UL>
|
Each tag also includes special
attributes.
For example:
With
<TABLE>,
you can specify its BORDER size.
Sample:
<TABLE BORDER="0">
This means the border is
not visible. Good for laying out or separating page content.
With
<TD>
(Table data), you can specify it's COLSPAN (Column span) and ROWSPAN
(Row span).
Sample:
Table below is a simple 3 x 3 table.
<table border="1" width="300"
height="100">
(The width and height is
specified in pixels. The dimensions could also be specified in
percentage format; i.e. "60%")
This first set of
<TR>
is the first row. The next three
<TD>
are the three columns.
<tr>
Table Row
<td> </td>
the code " "
means space
<td> </td>
<td> </td>
</tr>
This is the second row
<tr>
<td> </td>
<td> </td>
<td> </td>
</tr>
This is the third row
<tr>
<td> </td>
<td> </td>
<td> </td>
</tr>
</table>
Now let's add the attributes...
<TD COLSPAN="2" ROWSPAN="2">
Here's the code.
Row 1
<tr>
<td colspan="2" rowspan="2"> </td>
<td> </td>
</tr>
Row 2
<tr>
<td> </td>
</tr>
Row 3
<tr>
<td> </td>
<td> </td>
<td> </td>
</tr>
Notice Row 1 and Row 2 only
requires one extra
<TD>. This
is because Row 1 already specified to take up 2 columns to the
right and 2 rows below. Row 3 remained the same.
You do not need to learn all the
codes. The reason I suggest you learn the layout and some
codes is so that when you use a web page editor you can go into
"code" view and actually add or remove code if the page is not
behaving the way you want it to. Some editors might add code
that is not necessary.
With a web page editor and having
knowledge of HTML coding, when you
want to insert a table, a link, or an image, you'll actually
understand what is going on and how to look for these codes if you
need to fine tune them. These days it is faster and economical
to create web pages with web page editors.
If you're too anxious to really
get going and not really interested in all this coding stuff then
proceed with web page editors section.
|